Installing Safety Showers In Your Workplace: A How-To Guide
How to Install an Emergency Shower
Before you installBefore you begin, remove all packaging and double check that every component listed in the manufacturer’s instructions is present and undamaged. Once you’re satisfied that you have all the right parts, rinse the whole unit with a mixture of mild soap and hot water, making sure to flush away any debris that may have accumulated.
While the steps below can act as a useful guide, every safety shower is different. Before proceeding with the installation, be sure to read the manufacturer’s instructions thoroughly.
Installing a ceiling-mounted safety shower
You will need:
Wall fastening anchors
Pipe sealantLocate the unit close to a 1” potable water supply. Flush the line to make sure that it is free from contamination. Connect straight to the vertical water supply or alternatively use an elbow connector to make the connecting pipe vertical, then connect the safety shower to the water supply using pipe sealant.
When finished, open the water supply and activate the unit, ensuring that the water flow rate is sufficient and there are no leaks.
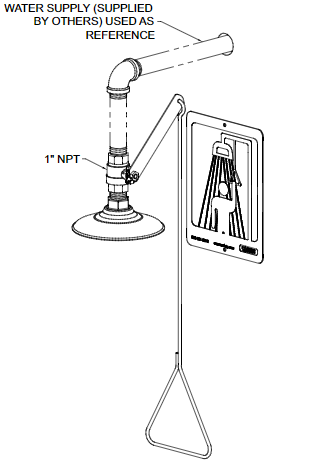
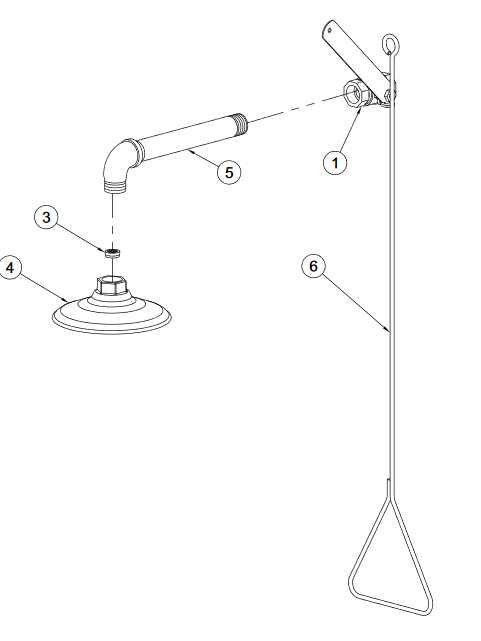
Installing a wall-mounted safety shower
You will need:
Wall fasteners
Pipe sealant
Pipe hangersInstall the 1” valve (1) to a supply of potable water, then flush the line. Next, connect the shower head (4) to the water supply using flow regulator (3) and the elbow and pipe connection provided (5). Assemble the activation rod (6) to the valve activation lever.
Finally, open the water supply and turn on the unit. Make sure that the flow rate is within ANSI Z358.1 guidelines and that there are no leakages.
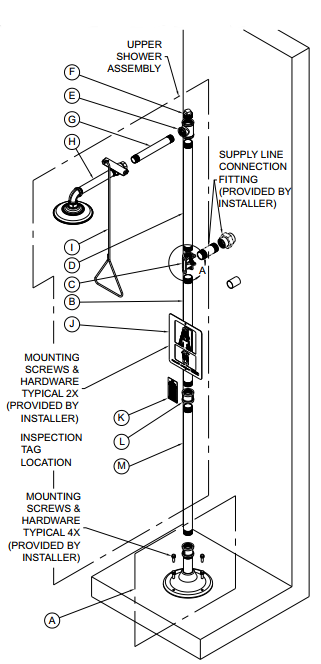
Installing a freestanding safety shower
You will need:
Wall fasteners
Floor anchors
Mounting bolts and washers
Pipe sealantLocate the pedestal assembly (A) close to a 1 ¼” potable water supply line. It should also be no less than 230mm from the rear and left-hand walls, and no less than 280mm from the right-hand wall. Hold the unit in place and mark the position of the mounting holes in the floor flange. Take away the unit and install floor anchors where you made the marks, then fix the unit to the floor using mounting bolts and washers.
Next, assemble the following components in order: B, C, D, E, F, L and M. Use pipe sealant to ensure an adequate seal. Ensure that all components are properly aligned, then assemble parts G and H in the same manner. Connect the activation handle to the valve as shown in the illustration.
Finally, connect the unit to the water supply line to the safety shower, either at point F or C, then turn on the water supply. Activate the unit and check thoroughly for leaks, also making sure that the flow rate is sufficient.
-
Posted by Iconography Ltd
2nd October 2017